Potter_Obsessed


It All Ends

About Me
- Crystal Belle
- Greer, South Carolina, United States
- I have been psping since 2004, I just started making scrap kits in 2010. In my spare time I love to read, Harry Potter and Twilight Saga are my favorite books, I also read anything true crime.Im a huge Harry Potter fan! I finished up my associates degree in Criminal Justice, September 2010. Im extremely proud of my self! Thank you for stopping by my blog :)
Monday, April 18, 2011
 Paparazzi
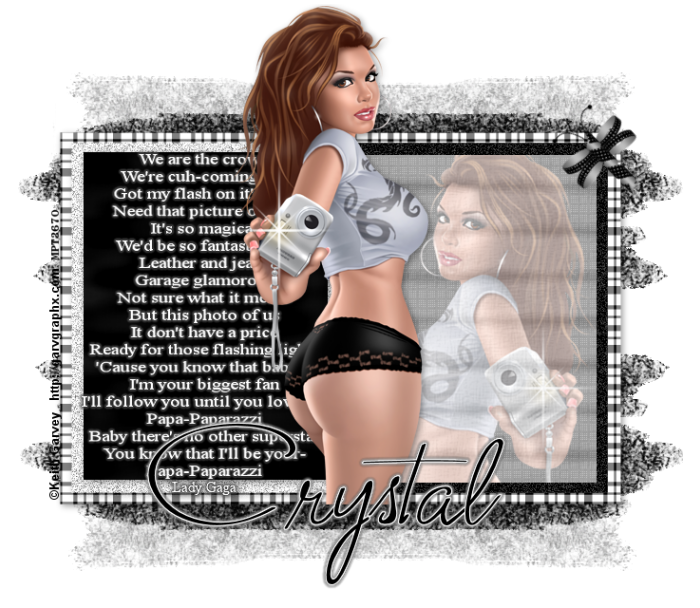
Supplies Needed:
Tube of Choice :I'm using the wonderful artwork of Keith Garvey.which you must obtain a license to use at PTE
My template called Paparazzi: You can get this on my Blog
Scrap Kit by • BEL • VIDOTTI • SCRAPS • called Black and White
EyeCandy 4000: Graident Glow
Sparkle Doodle of choice
Font of Choice: Im using "Monika Upright"
Read lets get started!
Open up the Template Hit shift and D to duplicate it close out the original one.
1) Click on the Black Square Layer Sections/Select all/Float/Defloat Copy and paste Black and White Paper 6 Sections/Invert/Delete Delete out the Black Square Layer Add a Drop 2/2/40/10
2) Click on the Left Square Layer Sections/Select all/Float/Defloat Copy and paste Black and White Paper 2 Sections/Invert/Delete Delete out the Left Square Layer Add the same Drop Shadow as before.
3) Click on the Left Grey Square Layer Sections/Select all/Float/Defloat Copy and paste Black and White Paper 3 Sections/Invert/Delete Add the same Drop Shadow as before. Go to Adjust/ Add /Remove Noise Using these settings Uniform/Checked Monochrome/Checked Noise/55
4) Click on the layer called Paparazzi We are going to add a Soft Gradient Glow Using Eye Candy 4000: Gradient Glow with these settings 3/25/100 Under Color click on Thin and use #404040 Staying on that layer go to Adjust/ Sharpness/Sharpen This helps so it doesnt look so blury
5) Click on the Black Right Square Sections/Select all/Float/Defloat Copy and paste Black and White Paper 1 Sections/Invert/Delete Add the same Drop Shadow as before. Go to Adjust/ Add /Remove Noise Using these settings Uniform/Checked Monochrome/Checked Noise/55
6) Click on Copy of Raster 2 layer Sections/Select all/Float/Defloat Copy and paste your tube I had to rezixe mny tube by 110% to make her bigger Sections/Invert/Delete Drop the Opacity down to 50 Add the same drop shadow as before Now I placed a Sparkle from my Picture Tubes on the camera lens on my tube.
7) Click on Copy of Raster 2 layer again Sections/Select all/Float/Defloat Copy and paste Black and White Paper4 Sections/Invert/Delete Drop the Opacity down to 60
8) Copy and paste your tube of choice, If you are using the same tube as me You want to go ahead and go to Image/Mirror Add the same Sparkle on the camera as before Add the same Drop Shadow as Before
9) Copy and paste the Black and White Element 12 Keep this on top untill you move it over to the Left side of your frame Once you have it in place then go ahead and move it to the bottom Duplicate and Mirror this layer Close out all layers except the 2 background elements Merge these 2 layers togeather/ Duplicate/ Flip I moved my Duplicated layer up a bit so it wasnt hanging so far below the bottom frame
10) Copy and Paste the Element 2 ( Butterfly) Image/Resize/35% Move the Butterfly to the Right corner of your frame Image/Rotate/Left/45
11) Go ahead and add your name Font of Choice I used "Monika Upright" Size 80 Stroke #ffffff Fill #000000 Stroke Width/1
12) I added a Gradient Glow Same settings as before only this time change to color to #ffffff add it again and change the color to #000000 Add the Credit and your License Number is using PTU
Delete out the White Background Resize if needed and save as PNG
Hope you enjoyed this tutorial
This tutorial was created on October 7th by CrystalBelle of Belle of the Ball Tutorials any resemblance to another Tag or Tutorial is purely coincidental.
I would love to see your trys with this Tutorial so it can be featured on my Blog.
Subscribe to:
Post Comments (Atom)
Grab My Blinkie

Proud Member Of

People I Stalk


0 comments:
Post a Comment