Potter_Obsessed


It All Ends

About Me

- Crystal Belle
- Greer, South Carolina, United States
- I have been psping since 2004, I just started making scrap kits in 2010. In my spare time I love to read, Harry Potter and Twilight Saga are my favorite books, I also read anything true crime.Im a huge Harry Potter fan! I finished up my associates degree in Criminal Justice, September 2010. Im extremely proud of my self! Thank you for stopping by my blog :)
Monday, April 18, 2011
 Garv Rocks!
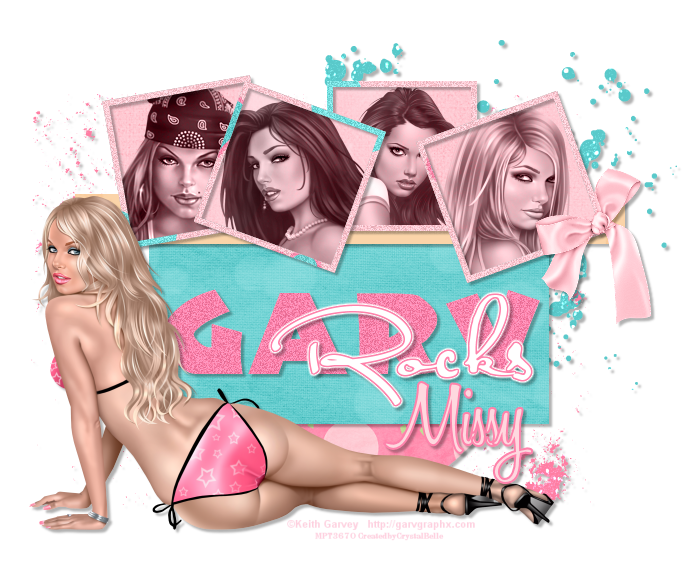
5 Tubes of Choice,
I'm using the wonderful art work of Keith Garvey. Which you must obtain a license to use at PTE
Template #2 by Wicky Scraps you can get that from her blog Here Just scroll all the way down to the bottom.
Eye Candy 4000-Gradient Glow
Ready Lets get Started!!
Open up the Template Delete the WickyScraps Layer Make the Bottom Oval layer active go to Sections/Select all/Float/Defloat Copy and paste the Happy Time Paper 8 resize it by 75%
Sections/Invert/Delete Now Delete the Bottom Oval Layer
Add a drop Shadow 3/3/30/3
Make the Large Middle Rectangle active Sections/Select All/Float/Defloat Copy and paste the Happy Time Paper 6 Sections/Invert/Delete Delete the Large Middle Rectangle Layer Add the same Drop Shadow as before
Make the Top Rectangle layer active. Sections/Select All/Float/Defloat Copy and paste the Happy Time Paper 1 Sections/Invert/Delete Delete the Top Rectangle Layer Add the same Drop Shadow as before.
Make the 1st Photo Frame layer active. Sections/Select All/Float/Defloat Copy and paste the Happy Time Paper 10 Sections/Invert/Delete Do the same for the rest of the frames Add the same Drop Shadow as before.
Make the 1st Photo Mat layer active Sections/Select All/Float/Defloat Copy and paste the Happy Time Paper 4 Sections/Invert/Delete Do the same for the rest of the photo mats.
Now make sure you have the 1st Photo Mat layer active again. Sections/Select All/Float/Defloat Copy and paste your tube of choice Sections/Invert/Delete
Make sure the tube layer is below the frame layer but above the colored paper layer.
Do the same for the rest of the frame layers, with a different tube.
Now on each tube layer change the Blend Mode to Luminance (L)
Now go back to the frame layers and lets add some Noise Go to Adjust/Add/Remove Noise Add Noise with these Settings Uniform/Monochrome/Noise 21%
Now I went ahead and placed a laying down tube at the bottom of the template
This is completely up to you. If you do choose to place a tube there go ahead and add the same drop shadow as before
Now lets make the GARV layer active Sections/Select All/Float/Defloat Flood Fill with the color #fe83ab and add the same noise settings as before.
And add the same drop shadow as before On the Rocks layer I added a gradient glow with these settings 3/25/100 Under Color I used Fat and added the color #fe83ab in with it.
Add the same drop shadow as before.
Copy and paste the Happy Time Glitter element 1 (blue) Move this all the way below every layer but above the white background I placed mine at the top right corner of the frame ( You can refere to my tag for placement)
Now Copy the Happy Time Glitter 2 (pink) Now with this one when I copied and pasted I didnt move it much at all just a tad over to the right.
Copy and paste Happy Time Bow#9 resize by 45% Place it where you like,
I placed mine on the right side on one of the frames.
Add the same drop shadow as before.
Now lets add your name Using Font of choice I used Honey Script Size 72/Colors #fe83ab/#fed8df Add the same drop shadow as before.
Add the Credit and your License Number is using PTU
Delete out the White Background Resize if needed and save as PNG
This tutorial was created on December/30th/2009 by Ċrÿstàlßellĕ of Belle of the Ball Tutorials and Scraps any resemblance to another Tag or Tutorial is purely coincidental
Subscribe to:
Post Comments (Atom)
Grab My Blinkie

Proud Member Of

People I Stalk


0 comments:
Post a Comment