Potter_Obsessed


It All Ends

About Me

- Crystal Belle
- Greer, South Carolina, United States
- I have been psping since 2004, I just started making scrap kits in 2010. In my spare time I love to read, Harry Potter and Twilight Saga are my favorite books, I also read anything true crime.Im a huge Harry Potter fan! I finished up my associates degree in Criminal Justice, September 2010. Im extremely proud of my self! Thank you for stopping by my blog :)
Monday, April 18, 2011
 Cherry Bomb
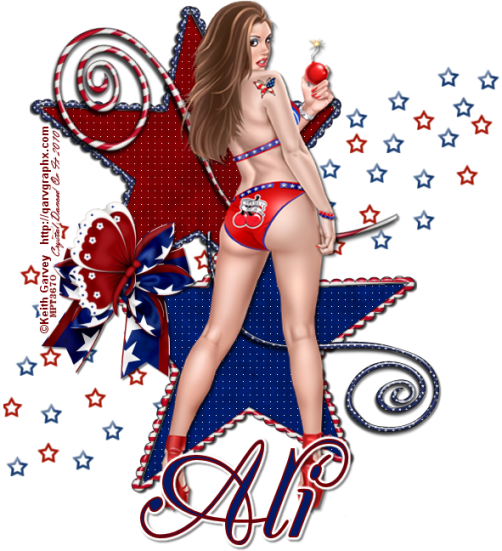
1Tube of Choice,
I'm using the wonderful art work of Keith Garvey. Which you must obtain a license to use at PTE
Scrap Kit By Designes by Ali called American Pride.This is a PTU kit and you can get it from Taggers Delight
This tutorial will follow the scrap kit I used but any scrap kit will do.
Open up a canvas 700x700Flood fill white
Paste DBA Frame #2resize by 65% Using your magic wand click inside the frame Sections/Modify/Expand by 3
Paste paper 21Sections/Invert/Delete Move this under the frame layer
Paste DBA Frame #3resize by 65% Go to Image and Mirror it
Move this so that it over laps the bottom of the first star
Using your magic wand click inside the frame Sections/Modify/Expand by 3
Paste paper 20Sections/Invert/Delete
Move this under the frame layer
Click on paper 21 in your first frame Effects/Texture/ Weave
Use these setting1/7/1/fill gaps checks
Make sure post colors are white
Do the same for the bottom paper also.
Close out all layers except both frames and both papers
Merge visible.
Copy and paste your tube of choice
Add a drop shadow2/2/50/2
Paste the Star Mess #3
resize by 85%Move it under your frame layersPaste Bow #7resize by 50#
Place it on the left hand side kind of on the edge where the 2 frames come togeather add the same drop shadow as before
Paste Butterfly #3resize by 50%resize again by 85%Move it so it sits on top of the bowadd the same drop shadow as before
Paste Doodle # 3resize by 50%Mirror the imageplace it at the bottom right of the bottom framePaste Doodle #3resize by 65%Rotate to the right 65 degreesMove it to the top left corner of the top frameAdd the same drop shadow to both doodles
Now lets add our nameFont I used is calledSilk Scritp AltSize 100Stroke-#760003Fill-#011b66I added a small graident glowwith these settings3/25/100Color White and I clicked on Fat Now add the same drop shadow as before
Add the Credit and your License Number is using PTU Delete out the White Background Resize if needed and save as PNG
This tutorial was created on June/26th/2010 by Ċrÿstàlßellĕ of Belle of the Ball Tutorials and Scraps any resemblance to another Tag or Tutorial is purely coincidental.
Subscribe to:
Post Comments (Atom)
Grab My Blinkie

Proud Member Of

People I Stalk


0 comments:
Post a Comment