It All Ends
About Me

- Crystal Belle
- Greer, South Carolina, United States
- I have been psping since 2004, I just started making scrap kits in 2010. In my spare time I love to read, Harry Potter and Twilight Saga are my favorite books, I also read anything true crime.Im a huge Harry Potter fan! I finished up my associates degree in Criminal Justice, September 2010. Im extremely proud of my self! Thank you for stopping by my blog :)
Talk To Me
My Stalkers
Sunday, July 24, 2011
 Angelica
 1 Tube of choice : Im using the wonderful art work of Barbara Jensen..This is an exclusive tube you can only get at Scraps and the City
Angeliki scrap kit by Toxic Desirez you can get this at Scraps with Attitude
Template 43 from Scraps Rebellion you can get this from their blog
Font of choice : Im using Angelica
Xero-Porcelain and Radiance
Ready lets get started!
Open up the template/Shift and D
close out the original, and change the canvas size to 900x765
delete the credit layer
Make sure that the rectangle1 layer is active
Sections/Select all/Float/Defloat
Copy and paste Angeliki Paper10
Sections/Invert/ Delete
Copy and paste Angeliki Paper10
Sections/Invert/ Delete
Do this to the other rectangle layer as well
Back to rectangle1
Sections/Select all/Float/Defloat
Copy and paste your tube of choice
Copy and paste your tube of choice
Sections/Invert/ Delete
With your tube layer active apply Xero-Porcelain with these settings
50/128/128/0/0/255
Do the same thing to the rectangle 2 layer
Delete out the black rectangle layers and add a drop shadow
3/0/50/2
Make the thin black rectangle layer active
Sections/Select all/Float/Defloat
Copy and paste Angeliki paper 1
Copy and paste Angeliki paper 1
Sections/Invert/ Delete
do this to the pink rectangle layer as well only use Angeliki paper 4
Making the black circle layer active
Sections/Select all/Float/Defloat
Copy and paste the Angeliki paper 19
Copy and paste the Angeliki paper 19
Sections/Invert/Delete
Make the black circle layer active again
Sections/Select All/Float/Defloat
Paste your tube place it to that its comming out of the top
Duplicate the tube layer
Make sure you are back on the original layer
Sections/Invert/ Delete
Now on the duplicated layer, using your eraser erase part of the bottom of your tube so its not overlapping the botton of the circle and merge these two layers togeather
Apply Xero-Radiance with these settings
10/85/102/161
Go back up to the Glitterback 1
Adjust/Color Balance/Manual Color Correction
Source-#000000
Target-#00a8c6
Do this to the other side as well
Now down on the white star
Sections/Select all/Float/Defloat
Copy and paste Angeliki paper 13
Copy and paste Angeliki paper 13
Sections/Invert/ Delete
do the above steps but this time use part of your tube
and change the Blend Mode to Luminance (L)
Now lets add our elements
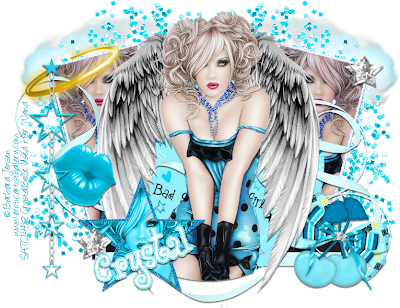
Copy and Paste Angeliki Cloud 1
Move it to the upper right corner behind the glitter rectangle
Duplicate and mirror
Copy and Paste the Angeliki Glitter
Move this to the left hand side so you can see it above and on the side of the template not so much on the bottom
Duplicate and Mirror this image
Copy and paste the Angeliki Halo
Resize by 50%
Rotate to the left by 25
Now using your eraser tool erase some of the halo so it looks like it is wrapped around the left top rectangle
Copy and paste the Angeliki Gem
resize by 50%
place this gem at the top right corner of the right rectangle
Duplicate and move this gem to the bottom left by the star
Copy and paste the Angeliki Lips 1
Mirror this image and move it to the left side above the star
add the same drop shadow as before
Copy and paste the Star Chain
resize by 75%
move this so it is up by the halo
(look at my tag if you need to :) )
add drop shadow
Copy and paste Angeliki Bow 3
resize by 50%
rotate to the right 25
move this to the bottom right rectangle, make sure it sits a little behind your tube if your tube had the wings,
Copy and paste the cherries
resize by 50%
place these on top of the bow..so the star gem on the cherries looks like it belongs on the bow's middle knot
Copy and paste Angeliki ribbon 2
This ribbon we want to move behind the tube layer so you cant see it ontop of the tube but you can see it on the sides.
Using font of choice size depending on your name I used size 72
Stroke-Null
Fill-White
type out your name, rotate it to the left by 25% move it so it sits inside the star
sections/select all/ modify and expand by 3
add a new layer move it below your name layer and fill it with
#89eaf7
add noise of 45%
add a drop shadow as before to that layer only
Go ahead and add the copyright and Lic number.
Merge and save as PNG.
Merge and save as PNG.
Thank you for trying my tutorial.This tutorial was created on July 24th,2011by CrystalBelle of Belle of the Ball Tutorials any resemblance to another Tag or Tutorial is purely coincidental.
Subscribe to:
Post Comments (Atom)
Grab My Blinkie
Artist and Such
- Anjara (1)
- Arthur Crowe (1)
- Barbara Jensen (4)
- Brian Gibbs (2)
- Christmas (1)
- Elias Chatzoudis (4)
- Exclusive (3)
- Free To Use Tubes (1)
- Halloween (2)
- Harry Potter (2)
- Ismael Rac (5)
- Jessica Dougherty (1)
- Just Scraps (4)
- Keith Garvey (7)
- New Years (1)
- Ted Hammond (1)
- Twilight (1)
- Valentines (1)
0 comments:
Post a Comment