Potter_Obsessed


It All Ends

About Me
- Crystal Belle
- Greer, South Carolina, United States
- I have been psping since 2004, I just started making scrap kits in 2010. In my spare time I love to read, Harry Potter and Twilight Saga are my favorite books, I also read anything true crime.Im a huge Harry Potter fan! I finished up my associates degree in Criminal Justice, September 2010. Im extremely proud of my self! Thank you for stopping by my blog :)
Showing posts with label Keith Garvey. Show all posts
Showing posts with label Keith Garvey. Show all posts
Wednesday, April 20, 2011
 Naughty Bunny

 Posted by
Crystal Belle
Posted by
Crystal Belle

1Tube of Choice, ( best to use one with a close up)
I'm using the wonderful art work of Keith Garvey. Which you must obtain a license to use at PTE
Naughty Valentine scrap kit by Toxic Desirez you can get this at Scraps with Attitude
I'm using the wonderful art work of Keith Garvey. Which you must obtain a license to use at PTE
Naughty Valentine scrap kit by Toxic Desirez you can get this at Scraps with Attitude
Template by Linda you can get this over at the Creative Misfits Blog(Its the 7th set down)
Xero- Porcelain and Radiance
Ready,
Lets get started!
Lets get started!
( I made this tag so you can use it anytime not just for Easter)
Open up the template shift and D close out the original, and delete the Linda layer
Make the Pink Rectangle layer activeSections/Select all/Float/Defloat Copy and paste Naughty Valentine Paper 9Now you want to move this paper so only the Naughty words shows.
(The valentine words will show at the top and bottom but we will fix that later) Sections/Invert/ Delete Make the Woman Left layer active
Sections/Select all/Float/Defloat Copy and paste Naughty Valentine Paper 4 Sections/Invert/ Delete and delete the woman layer, do this again to the right side
Make the Black Rectangle layer activeSections/Select all/Float/Defloat
Copy and paste Naughty Valentine Paper5 Sections/Invert/ Delete Make the Frame Layer active
Adjust/Add Noise/Uniform 45%add a drop shadow3/0/50/2
Make the Double Frame Layer activeAdjust/Color Balance/Manual Color Correction
Source~#ffffff
Target~#fcbfe4
Add the noise and drop shadow again
Make the Playboy Bunny left activeSections/Select all/Float/Defloat Copy and paste Naughty Valentine Paper 3 Sections/Invert/ Delete Delete out the playboy bunny layer
Do the same thing for the right side
add the same drop shadow as before to both of the bunnies
At this time you are going to need to move the black rectangle layer down to the double pink rectangle layers and merge them togeather
Now copy and paste a close up of the tube you want to use
Move it so its in the middle of the template
going across all 3 rectangles Sections/Select all/Float/Defloat/Invert
With your closeup still active we are going to add
Xero Porcelain
50/128/128/0/0/250
Then lets add Xero Radiance
128/50/128/255
Now change the canvas size to 750x675
Copy and paste your main tube, depending on what type of tube you are using place it where you think it looks best
I placed mine over on the right side add the drop shadow againChange the Playboy text to Overlay and add a small gradient glow to it
Now lets decorate :)
Copy and paste the Naughty Ribbon resize by 85% and move it down just a little bit ( you can refer to my tag for correct placement)
Add a drop shadow to itPaste the Fuzzy Cuffs resize by 50%Move these up to the left corner of the template
Using your eraser I used size 5 erase some of the hooks to it looks like they are wrapped around the frame
Paste the Naughty Condom and resize by 75%
Move it to the left bottom cornerPaste the Paddle and resize by 65%Place it on top of the condom
Paste the naughty Dice and resize by 50%Place these on top of the paddle and add the same drop shadow as before
Place the Naughty Sparkle Have this placed in the middle rectangle
Place the String resize by 75%Image Mirror and move it under all layersAdd the same drop shadow as before
Now lets add your name Font of choice Im using MoonDance Two
Size 80
Stroke 0
Fill~#f77cda
Add a new raster laterMove this under your name layer go back t your name layerSections/Select All/Float/Defloat/Expand x4
on the new raster layer flood fill with whiteAdd noise to the fill layer
and add the same drop shadow as before
Delete out the White Background Resize if needed and save as PNG
Delete out the White Background Resize if needed and save as PNG
Hope you enjoyed this tutorial
This tutorial was created on April 20th 2011 by CrystalBelle of Belle of the Ball Tutorials
This tutorial was created on April 20th 2011 by CrystalBelle of Belle of the Ball Tutorials
any resemblance to another Tag or Tutorial is purely coincidental.

 Labels:

Monday, April 18, 2011
Skater Chick
Posted by
Crystal Belle

This is an Exclusive tutorial only for The Creative Chicks So come on over we would love to have you!!
Cherry Bomb
Posted by
Crystal Belle
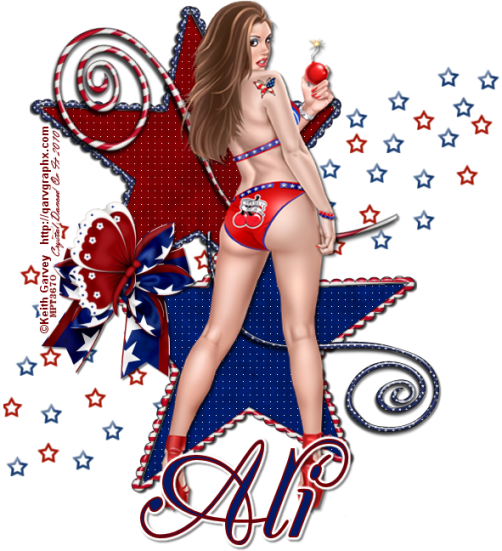
1Tube of Choice,
I'm using the wonderful art work of Keith Garvey. Which you must obtain a license to use at PTE
Scrap Kit By Designes by Ali called American Pride.This is a PTU kit and you can get it from Taggers Delight
This tutorial will follow the scrap kit I used but any scrap kit will do.
Open up a canvas 700x700Flood fill white
Paste DBA Frame #2resize by 65% Using your magic wand click inside the frame Sections/Modify/Expand by 3
Paste paper 21Sections/Invert/Delete Move this under the frame layer
Paste DBA Frame #3resize by 65% Go to Image and Mirror it
Move this so that it over laps the bottom of the first star
Using your magic wand click inside the frame Sections/Modify/Expand by 3
Paste paper 20Sections/Invert/Delete
Move this under the frame layer
Click on paper 21 in your first frame Effects/Texture/ Weave
Use these setting1/7/1/fill gaps checks
Make sure post colors are white
Do the same for the bottom paper also.
Close out all layers except both frames and both papers
Merge visible.
Copy and paste your tube of choice
Add a drop shadow2/2/50/2
Paste the Star Mess #3
resize by 85%Move it under your frame layersPaste Bow #7resize by 50#
Place it on the left hand side kind of on the edge where the 2 frames come togeather add the same drop shadow as before
Paste Butterfly #3resize by 50%resize again by 85%Move it so it sits on top of the bowadd the same drop shadow as before
Paste Doodle # 3resize by 50%Mirror the imageplace it at the bottom right of the bottom framePaste Doodle #3resize by 65%Rotate to the right 65 degreesMove it to the top left corner of the top frameAdd the same drop shadow to both doodles
Now lets add our nameFont I used is calledSilk Scritp AltSize 100Stroke-#760003Fill-#011b66I added a small graident glowwith these settings3/25/100Color White and I clicked on Fat Now add the same drop shadow as before
Add the Credit and your License Number is using PTU Delete out the White Background Resize if needed and save as PNG
This tutorial was created on June/26th/2010 by Ċrÿstàlßellĕ of Belle of the Ball Tutorials and Scraps any resemblance to another Tag or Tutorial is purely coincidental.
Glam Princess
Posted by
Crystal Belle
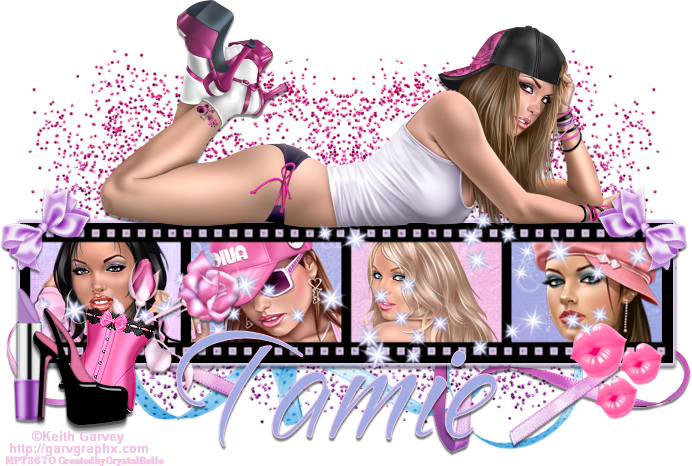
5 Tubes of Choice,
I'm using the wonderful art work of Keith Garvey. Which you must obtain a license to use at PTE
Scrap Kit By Tamie from ADDICTIVE PLEASURES called Glam Princess.
This is a PTU kit and you can get it from Twilight Scraps
Eye Candy 4000-Gradient Glow
This tutorial will follow the scrap kit I used but any scrap kit will do.
Open up a canvas 700x700
Paste the filmstrip and resize by 85%
Using your magic wand click in side the first frame.Sections/Modify/Expand by 3
Paste paper 11Sections/Invert/Delete
Move this under the frame layer
Contuine doing this for the next frames using a different paper.
Using your magic wand again click in side one of the frames Sections/Modify/Expand by 3
Paste your tube of choice Sections/Invert/Delete Move it under the frame layer
Contuine doing this for the next frames using a different tube each time.
Make sure your 5th tube is a tube that is laying down.
Place it at the top of the film strip
Paste ribbon 5 and move it to the bottom of all the layers
Place it to you can see it from the bottom of the filmstrip
add a drop shadow3/0/50/2
Paste the shoe2 resize it by 25% place it on the left side bottom filmstrip
Paste the sparklesmove it to the top of the filmstrip add a small gradient glow3/25/100#a6a9e2
Paste the Glitter resize by 75%
Move it to the very bottomDuplicate/Mirror
Paste Bow 6 resize by 45%Rotate to the left by 45
Move it to the top left of the filmstrip
Layers duplicate image mirror
At this time add any other elements you would like I added some makeup, and another ribbon at the bottom of the filmstrip
Using font of choice I used SandyTextHmkBoldSize 100 Stroke 1Forground/#f4c4e7Background/#a1ace2
Add the same drop shadow as before
Add the Credit and your License Number is using PTU Delete out the White Background
Resize if needed and save as PNG
This tutorial was created on February/26th/2010 by Ċrÿstàlßellĕ of Belle of the Ball Tutorials and Scraps any resemblance to another Tag or Tutorial is purely coincidental.
Garv Rocks!
Posted by
Crystal Belle
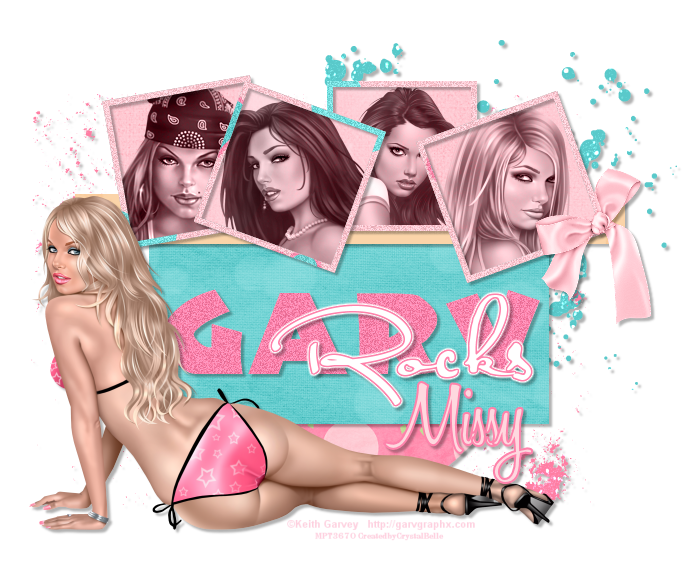
5 Tubes of Choice,
I'm using the wonderful art work of Keith Garvey. Which you must obtain a license to use at PTE
Template #2 by Wicky Scraps you can get that from her blog Here Just scroll all the way down to the bottom.
Eye Candy 4000-Gradient Glow
Ready Lets get Started!!
Open up the Template Delete the WickyScraps Layer Make the Bottom Oval layer active go to Sections/Select all/Float/Defloat Copy and paste the Happy Time Paper 8 resize it by 75%
Sections/Invert/Delete Now Delete the Bottom Oval Layer
Add a drop Shadow 3/3/30/3
Make the Large Middle Rectangle active Sections/Select All/Float/Defloat Copy and paste the Happy Time Paper 6 Sections/Invert/Delete Delete the Large Middle Rectangle Layer Add the same Drop Shadow as before
Make the Top Rectangle layer active. Sections/Select All/Float/Defloat Copy and paste the Happy Time Paper 1 Sections/Invert/Delete Delete the Top Rectangle Layer Add the same Drop Shadow as before.
Make the 1st Photo Frame layer active. Sections/Select All/Float/Defloat Copy and paste the Happy Time Paper 10 Sections/Invert/Delete Do the same for the rest of the frames Add the same Drop Shadow as before.
Make the 1st Photo Mat layer active Sections/Select All/Float/Defloat Copy and paste the Happy Time Paper 4 Sections/Invert/Delete Do the same for the rest of the photo mats.
Now make sure you have the 1st Photo Mat layer active again. Sections/Select All/Float/Defloat Copy and paste your tube of choice Sections/Invert/Delete
Make sure the tube layer is below the frame layer but above the colored paper layer.
Do the same for the rest of the frame layers, with a different tube.
Now on each tube layer change the Blend Mode to Luminance (L)
Now go back to the frame layers and lets add some Noise Go to Adjust/Add/Remove Noise Add Noise with these Settings Uniform/Monochrome/Noise 21%
Now I went ahead and placed a laying down tube at the bottom of the template
This is completely up to you. If you do choose to place a tube there go ahead and add the same drop shadow as before
Now lets make the GARV layer active Sections/Select All/Float/Defloat Flood Fill with the color #fe83ab and add the same noise settings as before.
And add the same drop shadow as before On the Rocks layer I added a gradient glow with these settings 3/25/100 Under Color I used Fat and added the color #fe83ab in with it.
Add the same drop shadow as before.
Copy and paste the Happy Time Glitter element 1 (blue) Move this all the way below every layer but above the white background I placed mine at the top right corner of the frame ( You can refere to my tag for placement)
Now Copy the Happy Time Glitter 2 (pink) Now with this one when I copied and pasted I didnt move it much at all just a tad over to the right.
Copy and paste Happy Time Bow#9 resize by 45% Place it where you like,
I placed mine on the right side on one of the frames.
Add the same drop shadow as before.
Now lets add your name Using Font of choice I used Honey Script Size 72/Colors #fe83ab/#fed8df Add the same drop shadow as before.
Add the Credit and your License Number is using PTU
Delete out the White Background Resize if needed and save as PNG
This tutorial was created on December/30th/2009 by Ċrÿstàlßellĕ of Belle of the Ball Tutorials and Scraps any resemblance to another Tag or Tutorial is purely coincidental
Paparazzi
Posted by
Crystal Belle
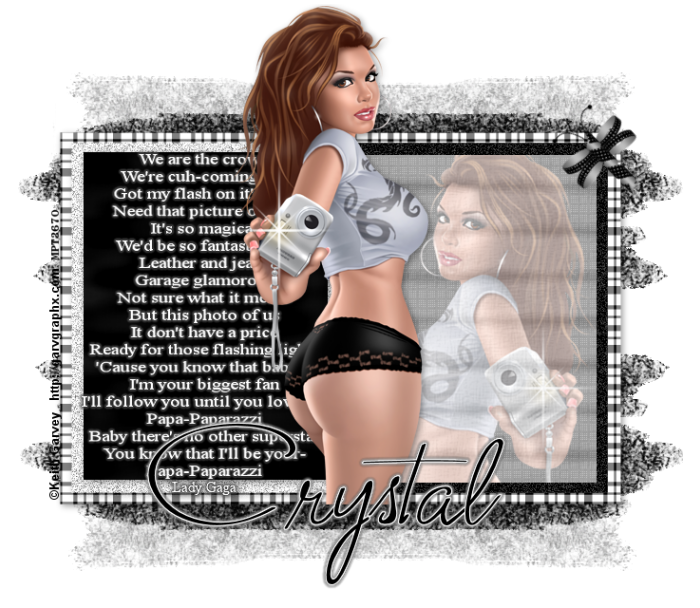
Supplies Needed:
Tube of Choice :I'm using the wonderful artwork of Keith Garvey.which you must obtain a license to use at PTE
My template called Paparazzi: You can get this on my Blog
Scrap Kit by • BEL • VIDOTTI • SCRAPS • called Black and White
EyeCandy 4000: Graident Glow
Sparkle Doodle of choice
Font of Choice: Im using "Monika Upright"
Read lets get started!
Open up the Template Hit shift and D to duplicate it close out the original one.
1) Click on the Black Square Layer Sections/Select all/Float/Defloat Copy and paste Black and White Paper 6 Sections/Invert/Delete Delete out the Black Square Layer Add a Drop 2/2/40/10
2) Click on the Left Square Layer Sections/Select all/Float/Defloat Copy and paste Black and White Paper 2 Sections/Invert/Delete Delete out the Left Square Layer Add the same Drop Shadow as before.
3) Click on the Left Grey Square Layer Sections/Select all/Float/Defloat Copy and paste Black and White Paper 3 Sections/Invert/Delete Add the same Drop Shadow as before. Go to Adjust/ Add /Remove Noise Using these settings Uniform/Checked Monochrome/Checked Noise/55
4) Click on the layer called Paparazzi We are going to add a Soft Gradient Glow Using Eye Candy 4000: Gradient Glow with these settings 3/25/100 Under Color click on Thin and use #404040 Staying on that layer go to Adjust/ Sharpness/Sharpen This helps so it doesnt look so blury
5) Click on the Black Right Square Sections/Select all/Float/Defloat Copy and paste Black and White Paper 1 Sections/Invert/Delete Add the same Drop Shadow as before. Go to Adjust/ Add /Remove Noise Using these settings Uniform/Checked Monochrome/Checked Noise/55
6) Click on Copy of Raster 2 layer Sections/Select all/Float/Defloat Copy and paste your tube I had to rezixe mny tube by 110% to make her bigger Sections/Invert/Delete Drop the Opacity down to 50 Add the same drop shadow as before Now I placed a Sparkle from my Picture Tubes on the camera lens on my tube.
7) Click on Copy of Raster 2 layer again Sections/Select all/Float/Defloat Copy and paste Black and White Paper4 Sections/Invert/Delete Drop the Opacity down to 60
8) Copy and paste your tube of choice, If you are using the same tube as me You want to go ahead and go to Image/Mirror Add the same Sparkle on the camera as before Add the same Drop Shadow as Before
9) Copy and paste the Black and White Element 12 Keep this on top untill you move it over to the Left side of your frame Once you have it in place then go ahead and move it to the bottom Duplicate and Mirror this layer Close out all layers except the 2 background elements Merge these 2 layers togeather/ Duplicate/ Flip I moved my Duplicated layer up a bit so it wasnt hanging so far below the bottom frame
10) Copy and Paste the Element 2 ( Butterfly) Image/Resize/35% Move the Butterfly to the Right corner of your frame Image/Rotate/Left/45
11) Go ahead and add your name Font of Choice I used "Monika Upright" Size 80 Stroke #ffffff Fill #000000 Stroke Width/1
12) I added a Gradient Glow Same settings as before only this time change to color to #ffffff add it again and change the color to #000000 Add the Credit and your License Number is using PTU
Delete out the White Background Resize if needed and save as PNG
Hope you enjoyed this tutorial
This tutorial was created on October 7th by CrystalBelle of Belle of the Ball Tutorials any resemblance to another Tag or Tutorial is purely coincidental.
I would love to see your trys with this Tutorial so it can be featured on my Blog.
Key to my Heart
Posted by
Crystal Belle
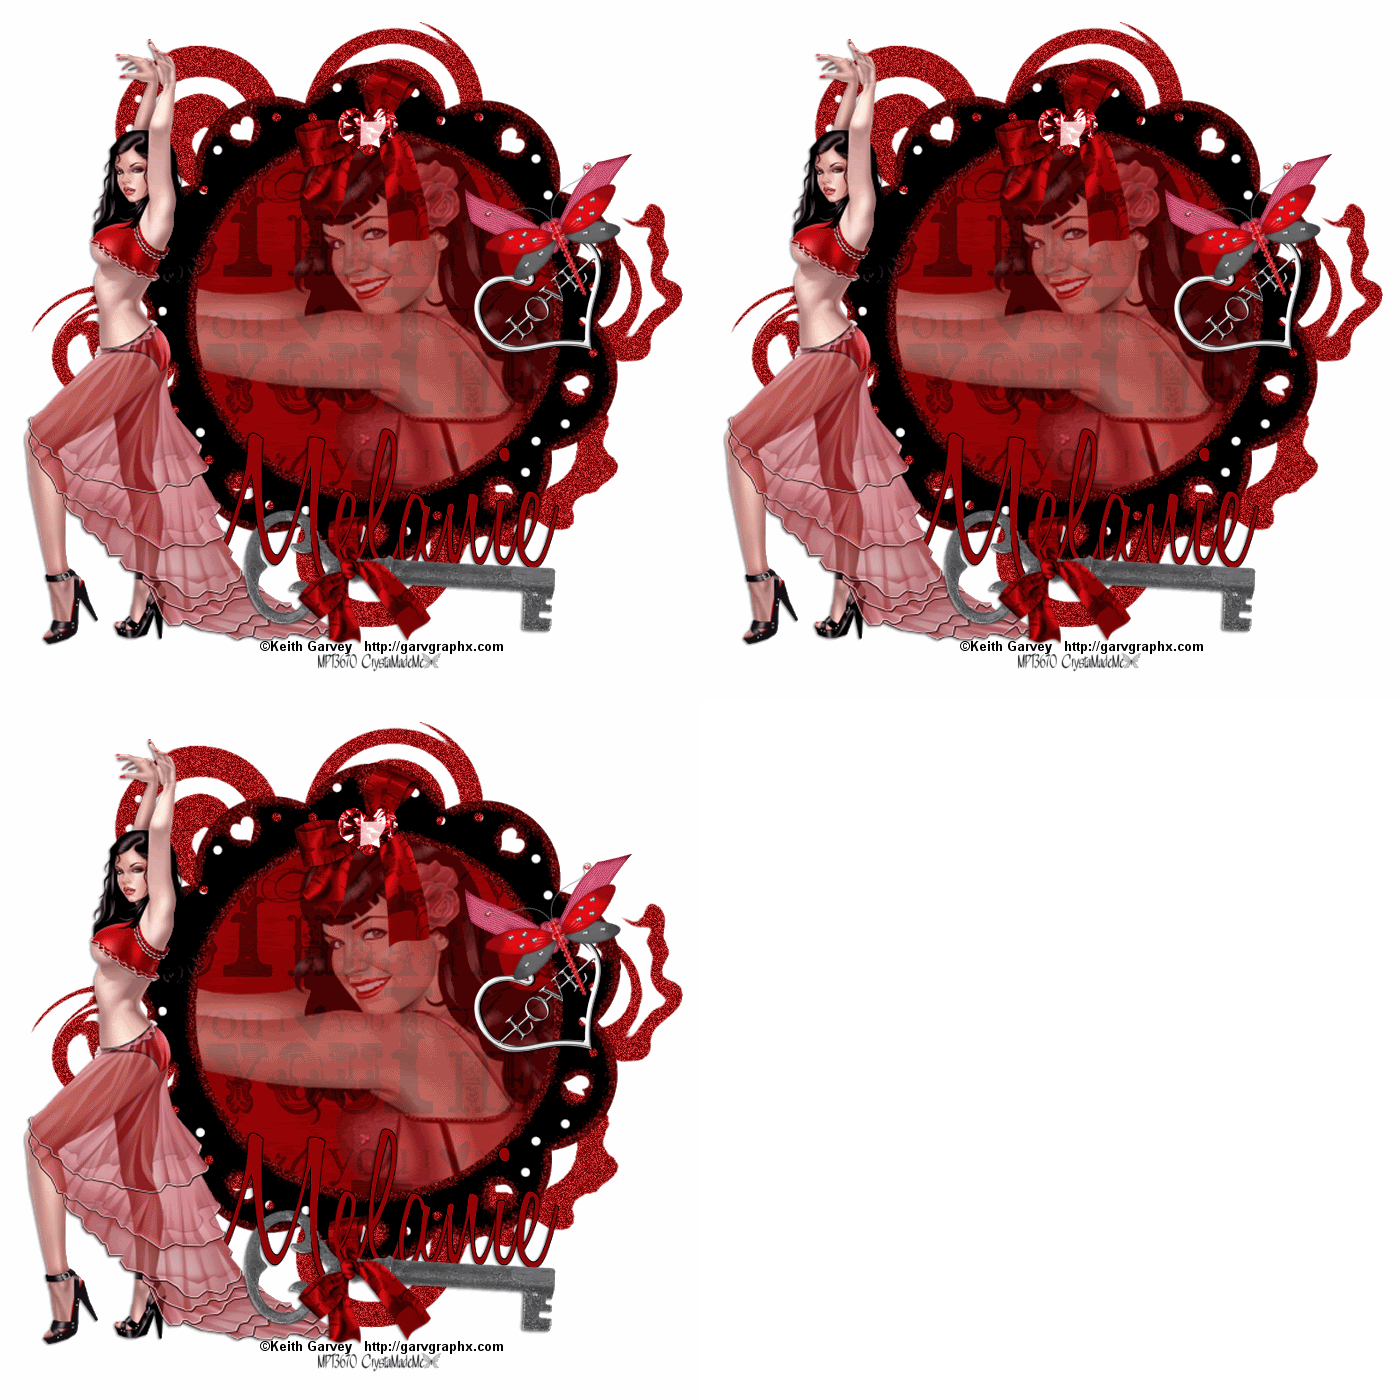
Plugin Dsb Flux/BrightNoise Font of Choice Animation Shop Tube of Choice .Iam using the wonderful artwork of Keith Garv.
Which you must obtain a license to use at PTE
Beautiful Scrap Kit By Missy from Misfits Scraps Called~I Heart You~ You can get this from her Blog Here
Open up a canvas 700x700 Flood fill White
Open Up Missy_iheartyou_frame2 Paste it and resize it to your liking I resized mine by 85%
Using your magic wand,Click inside your frame go to Sections/Modify/Expand x3
Copy and paste your Missy_iheartyou_paper 3 Resize your paper by 70% Sections/Invert and hit Delete
Make sure you move this layer under your frame layer Back on your frame layer click inside it again Sections/Modify/Expand by 3
Copy and paste your tube,Depending on your tube you may have to resize it do its bigger, To do this/Go to Image/Resize/150 (or what ever you feel comfortable with) Move the tube layer below your frame layer Change your Opacity do to 50%
Now close out your white background and merge your Frame/Paper and Tube layer togeather Copy and paste Missy_iheartyou_Doodle2 Move it below your frame layer and resize it by 120% Move it around so you can see it behind your frame layer (Do not merge this layer yet)
At this time,Lets go ahead and copy and paste your main tube,Place it where she looks best, I placed mine on the left hand side of my frame Go to effects Drop shadow and apply these settings 1/-1/50/3
Open up Missy_iheartyou_Loveribbon1 Resize by 50% Move it to the right of your frame (refer to tag) Open up Missy_iheartyou_Dragonfly2 Resize this by 50% Resize by 50% again rotate by 25% move the dragonfly so it sits above the loveribbon Open up Missy_iheartyou_bow4 resize by 50%
Move to the top of your frame Open up Missy_iheartyou_Heartgem2 Resize by 25%
Move this gem so it sits on your bow where the knot is. At this time you may add any other elements you would like. Lets add your name I used font SuzanneQuilSH Color Black for the Stroke #910406 for the fill Size 100 Stroke1
Add your Copywrite and Lic.Number
Now Go back down to your Doodle layer Make sure that layer is highlighted Go to DsbFlux/Bright Noise With These Settings Intensity 40 Mix Checked
Now Copy Merge over in to Animation Shop Back in psp hit your undo Add your Bright noise again Same settings only this time hit the Mix "Twice" Copy Merge and paste it in animation shop after current frame
Back in to PSP and hit your undo button Add Bright Noise again this time hit the Mix "Three" times Copy Merge in animation shop after current frame
Click View Animation,If you like what you see go ahead and Save.
Thank you for trying my tutorial,I hope you liked it. This tutorial was created on January /02/2009 by Ċrÿstàlßellĕ any resemblance to another Tag or Tutorial is purely coincidental.
Subscribe to:
Posts (Atom)
Grab My Blinkie

Proud Member Of

People I Stalk


