Potter_Obsessed


It All Ends

About Me
- Crystal Belle
- Greer, South Carolina, United States
- I have been psping since 2004, I just started making scrap kits in 2010. In my spare time I love to read, Harry Potter and Twilight Saga are my favorite books, I also read anything true crime.Im a huge Harry Potter fan! I finished up my associates degree in Criminal Justice, September 2010. Im extremely proud of my self! Thank you for stopping by my blog :)
Showing posts with label Just Scraps. Show all posts
Showing posts with label Just Scraps. Show all posts
Monday, June 27, 2011
 Proud Gryffindor

 Posted by
Crystal Belle
Posted by
Crystal Belle

For this tutoial you will need
Wizarding School scrap kit by Traci Reed and Meghan Mullens
You can get this kit over at Sweet Shoppe Designs
You can get this kit over at Sweet Shoppe Designs
Eyecandy 5 Impact- Glass
Xero- Fritillary
3 fonts of choice- one of these needs to be a fat font
I used Porky's
Start out with a canvas 1000x800
( Dont worry we will resize later)
Using your Fat font wrote out Gryffindor
Stroke #be3139
Fill Null
Move it to the center of the canvas
Using your magic wand Click inside every other letter
Modify and expand by 2
New layer and flood fill with
Do the same with the remaining letters only this time flood fill them with
#d8c05e
Bring the Stroke layer to the top
On the Gold letter layers add some noise
Gaussian 11%
Add it again
With the Red letter layer active
add Xero-Fritillary with these settings
5/31/100/54
Merge both letter layers togeather
Using your other Font ( I used AeronauBold)
Type out Proud
Stroke Null
Fill #404040
Size 75
Rotate 15 degrees to the left
Add Eye Candy Glass
with these settings
Bevel Width- 13.21
Opacity- 3
Inner Shadow- 5
Color- White
Rest of the boxes 0
Place it at the top of the G
Now lets decorate it!
Copy and paste the Wizard School Owl
Rezise it by 25% and then again by 75%
add the same Drop shadow as before
Add it again this time change the top number to 0 and the bottom to 3
Put the Owl above the N and the D so it looks like the Owl is standing on it
Copy and paste the Wizard School String 1
resize it by 35 and then again by 85
Place it above the G by the word Proud
make sure this layer is still behind the Owl
Copy and Paste Wizard School Magic Dust
resize by 25%
Move it to the very bottom make sure you can still see it sticking out behing the G
Duplicate and Mirror
copy and Paste the Wizard School lightingbolt
Resize 25% and then again by 75%
Rotate to the Right 15 degrees do this twice
Place it so it sits ontop of the O at the end
Using your eraser erase some of it so it looks like its going through the O
Copy and paste the Wizard School Glasses
Resize by 25% and then by 75%
Rotate to the left by 15
Now using your last Font of choice
Stroke Null
Fill- #c8b04e
Fill- #c8b04e
Size 100 depending on your name
add a small gradient glow
Merge resize and save as PNG.
Thank you for trying my tutorial.This tutorial was created on May 15th,2011by CrystalBelle of Belle of the Ball Tutorials any resemblance to another Tag or Tutorial is purely coincidental.

 Labels:

Monday, April 18, 2011
Mon Amour
Posted by
Crystal Belle
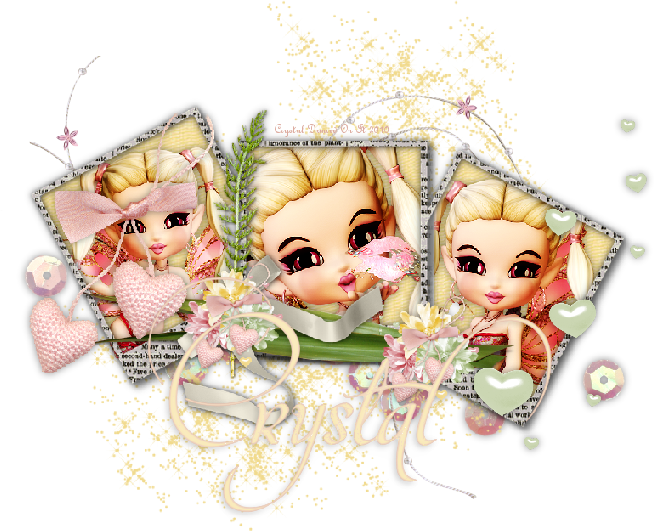
Tube of Choice
Eye Candy 5 Impact Glass
Scrap Kit By Designes by Ali called Toujours Et pour Jamais.
This is a PTU kit and you can get it from Taggers Delight
Everything in this tutorial is from this kit but you can use anything you like.
Lets get startedOpen up a 800x800 canvas
Dont worry we will resize later
Paste Frame 2resize by 75%Using your magic wand click inside each frame
Sections/Float/Defloat/Modify
expand by 8paste Paper 45Sections/Invert/DeleteSections/None
Move this layer under the frame layer
Make the frame layer active againCopy and paste your first tube in to the first frameDo this for each section of the frame using a different tube if you like
Rememeber to expand by 8 each timeAdd a drop shadow to the frame layer and your tube layers0/0/44/14
Paste the String 1 rotate to the right 90%move this below the frame and tube layersPaste Hearts 3resize by 50%
Mirror Image and Move it to the right hand side of the frame add the same drop shadow as before
Paste Glitter Stars 2resize by 75%Move it below all layersAdjust/Color Balance/ Manual Color CorrectionSource~ #ffffffTarget~ #f1da8c
Paste Heart Bow String 1Resize 50%/ Resize again by 75%move it to the left hand side of the frame( refere to tag)
Take your eraser and erase part of the top loop so it looks like the loop is hanging on the corner of the frame add draop shadow Paste Sequins 1resize by 75%
Move to the bottom of your frame layer and flip move it show it shows at the bottom of the frameadd drop shadow
Now Lets add your nameFont of choice I'm using Mon Amour ScriptSize 74Stroke 2 ~ #ddaca0 Fill~ #f2de85
Eye Candy 5 Impact Glass with these settingsFactory DefaultBasic~150/30/0/100/100/100/0/2/45/0
Glass Color~ #fdf1d5Add a drop shadw to your name 2/-2/10/10
Add the same drop shadow againResize to your likingand we are done!
This tutorial was created on July/26th/2010 by Ċrÿstàlßellĕ of Belle of the Ball Tutorials and Scraps any resemblance to another Tag or Tutorial is purely coincidental
A Mothers Love
Posted by
Crystal Belle


You will need 1 picture of choice
I'm using one of my own
Scrap Kit By Laura's Designz called A Mothers Love.This is a PTU kit and you can get it from Taggers Delight
This tutorial will follow the scrap kit I used but any scrap kit will do.
Open up a canvas 700x700
Paste the Bracket Frame 2 and resize by 85%
Using your magic wand click inside the frame
Sections/modify/Expand by 3and paste your picture in the frame
Once you have your picture right go to Sections/invert and hit delete.
Now because I have a son I went ahead and added another frame behind my main frame
If you want to do this just follow these directions
Paste Bracket Frame 1
Move it below your picture and main frame layerResize by 90%
and rotate it to the left by 25 degrees
Go to adjust color balance and click on Manuel Color Correction change the Source color to/ #9379b4
Change the target color to #7a7cde click ok, and then go back in and do it again this time just click ok ( do not change the colors)
Now using your magic wand click inside the blue frame sections/modify/expand by 3
Paste paper 35 resize by 75% Sections/invert/delete
move this paper so it is under the blue frame
Go to adjust color balance and click on Manuel Color Correction change the Source color to/ ##ad9fbd Change the target color to #7a7cde
Add a drop shadow to the frame layer 2/2/50/2
Add the same drop shadow to the pink frame layer
Paste the Doodle #5 and resize it by 85
Move it so it shows a little bit up on the left of the bottom fame, and than move it to the bottom.
Go to adjust color balance and click on Manuel Color Correction change the Source color to/ #ad9fbd Change the target color to #7a7cde
Duplicate/mirror/flip
Go to adjust color balance and click on Manuel Color Correction change the Source color to/ #6259dd Change the target color to #deb5c1
Paste the ribbon heart 1 resize by 50 resize again by 75
Move this to the bottom of your frame on the left side
add the same drop shadow as before
Paste Satin Bow 3 resize by 50 and place it at the bottom of the top frame
add your drop shadow
Paste rose 3 resize by 50 and move it to the left of the pink frame and move it under the ribbon heart
Duplicate and rotate to the left by 25 degrees using your freehand section circle the pink rose and only the pink rose
Go to adjust color balance and click on Manuel Color Correction change the Source color to/ #ecdae1 Change the target color to/ #9badf1
Add the same drop shadow as before
Lets add your name
Font of choice I used Snapper Scriptstroke/fill/#5c54d1stroke width 2
I placed my name at the bottom of the bow
I added a gradient glow3/25/100Color/#5c54d1
Add the same glow again this time change the color to#dfb6c2
Delete out the White Background
Resize if needed and save as PNG
This tutorial was created on July/6th/2010 by Ċrÿstàlßellĕ of Belle of the Ball Tutorials and Scraps any resemblance to another Tag or Tutorial is purely coincidental.
Country Christmas
Posted by
Crystal Belle

This tutorial was created on October /10/2008 by Ċrÿstàlßellĕ any resemblance to another Tag or Tutorial is purely coincidental.
This tag was created in PSP 9 and can be done in other versions
You will need: Scrap Kit from BitterSweet Designs Called Country Snowmen You may Visit her blog here and You can purchase the kit at TaggersScraps ( Im sorry but BitterSweets has closed up her shop and stopped selling her scraps, If you do not have this kit there is no way to get it now. Im so sorry.)
Lets Begin.. Open up a canvas 700x700 flood fill white Using your Preset Shape: Square~Line Style Solid Width~10 Forground color~#85a8ac Fill Color~Null
1) Draw out a square in the middle of your canvas Convert to Raster Layer Click in side the frame shape with yoru magic wand.. Sections/Modify/Expand by 3 Copy and paste Country Snowman Fun paper 10 Sections/invert/delete/sections select none Move this layer below your frame layer Merge both layers visible
2) Draw out another square slightly larger then your previeous square..keep everythign the same except change the color to #dacab0 Using your magic wand click inside the Frame Sections/modify/expand by 3 Copy and Paste Country Snowman Fun Paper 6 Sections/invert/delete/sections select none merge visible the new frame and paper go to image rotate/free rotate by 15% to the Left
3) We are going to make another frame..Same size as before..only change the color to #5f0413 Using your magic wand click inside the Frame Sections/modify/expand by 3 Copy and Paste Country Snowman Fun Paper 7 Sections/invert/delete/sections select none merge visible the new frame and paper go to image rotate/free rotate by 15% to the Right
4) Open up the 3 snowmen..resize each by 50 Move them to your liking..I moved one snowman in the front and the 2 others behind him... add a drop shadow of 1 1 50 5 to all Go ahead and merge your snowmen togeather
5) Choosing a country snowman fun wrap of your choice..Place it at the top of your main frame..I had to resize mine by 43% to make it fit right..
6) Copy and paste a raindrop of choice..Resize to your liking and move it below the fun wrap and snowmen..You want the raindrops to be on the top frame
7) Copy and pasteFun Flower1 resize by 25..Place this Flower in the middle of the wrap
8)Find the glitter snowflake 7 resize it by 25% Place the snowflake On the edge of the wrap..duplicate and mirror..you may have to move the duplicated snowflake over a bit to look right.. Using eye candy 4000/Gradient Glow/ 3 25 100 Color~White
9) Now we are going to add your text'I wrote out Country Christmas across the top of my top frame.. Font~A&S Christmas Script Stroke~White Fill~#90934e size 72 Go to effects drop shadow 1 2 50 5 Color~#600514 go in and do the drop shadow one more time..same settings
10) Hide your white background..and merge layers visible Resize your image by 85%
11) Add your name I used Christmas 4 font size 100 stroke null fill~#610514
12) using eye candy 400 add a gradient glow 3 25 100 Color white Go back and do another gradient glow..this time changing the color to #610514 add it again with the same color
At this time add your copyrights if you used any tubes.. thank you for trying my tut..I would love to see your work..So please email me your results and I will display them on my blog
Subscribe to:
Posts (Atom)
Grab My Blinkie

Proud Member Of

People I Stalk


