Potter_Obsessed


It All Ends

About Me

- Crystal Belle
- Greer, South Carolina, United States
- I have been psping since 2004, I just started making scrap kits in 2010. In my spare time I love to read, Harry Potter and Twilight Saga are my favorite books, I also read anything true crime.Im a huge Harry Potter fan! I finished up my associates degree in Criminal Justice, September 2010. Im extremely proud of my self! Thank you for stopping by my blog :)
Monday, April 18, 2011
 So What!
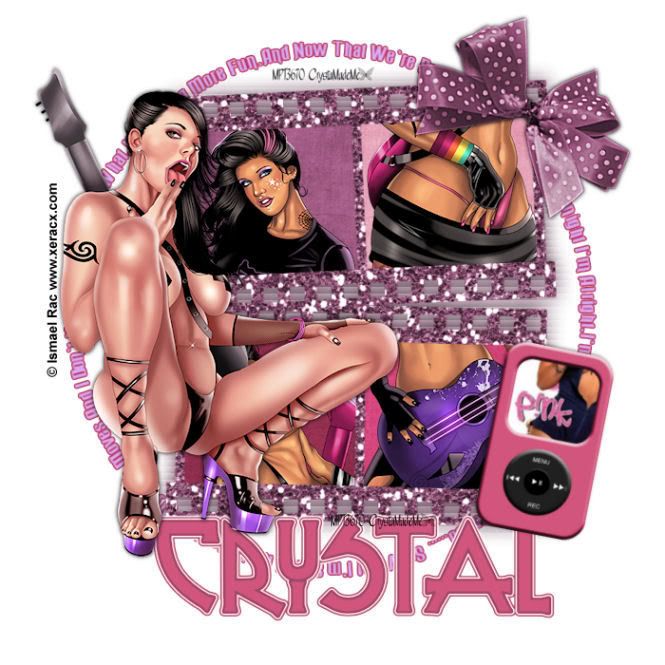 3 Tubes of Choice ~Iam using the wonderful artwork of Ismael Rac. Which you must obtain a license to use at XeracX Store (Now when I made this tutorial he was still with MPT that is why there is a MPT lic number on it).
 Please do not share with out my permision, This is my own creation
Eye Candy 4000/Gradient Glow
Front of choice~ I used Russel White
Ok Lets Get Started
Open up a canvas 700x700 Flood fill White
Open up the Girlx Rock Frame 1
and place it in the middle of your canvas
Resize by 85%
Click in side the first section of your frame
Section/Modify/Expan by 4
Copy and past a part of your first tube
inside the frame
Section/Invert/Delete
Move this layer under your frame
Using the same tube We are going to do the same thing only time time
Click inside the last frame on the bottom row
Use a different part of your tube.
Do the same thing to the remaining spaces on your frame
But use a different tube
Open up paper of choice
Using your magic wand click inside the 4 spaces of the frame
Paste your paper
Section/Invert/Delete
Move this layer under both your frame and your tube layers
Closing out your white Background Lets go ahead a merge the frame/Tubes/Paper Layer
Copy and paste your Main Tube Where you think it looks best
I placed mine on the left had side of my frame
Add a drop shadow 1/1/50/5 and again -1/-1/50/5
Open up the WordArt I provided
Move it below your frame and tube layer
Resize the layer by 90%
At this time change the color to best fit your tubes
Using Eye Candy 400/Gradient Glow
With these Settings
3/25/100
Under Color Select
Fat/White/BF2F52
Copy and Paste Bow #3 resize it 90% do this twice
Rotate by 45% to the Right
Adjust/Sharpen Do this twice
Now got to Adjust/Sharpen More
Move the bow to the top of your frame
On The right side
Add a drop shadow -1/1-/50/5
Add the drop shadow again this time changing it to 1/1/50/5
Go Back to your Frame layer Duplicate it using the Original Layer go to
Adjust/Blur/Gaussian Blur/10
Now go to Texture Effects/Blinds with this settings
7/30/Color Black
Make sure both Boxes are checked
Go ahead and do that again
At this time you may add any elements you would like to use
I used one of the Ipods and used a picture of Pink! since the lyrics in the word art are from her
song, Now we are going to add our name
The font I used was called Russel White
Size 100
Add the same Graident Glow as before only this time change the color to #905174
Add the gradent again
Add the copywrite and your Lic number if using PTU
This tutorial was created on March /01/2009 by Ċrÿstàlßellĕ of Belle of the Ball Turotials any resemblance to another Tag or Tutorial is purely coincidental.
Subscribe to:
Post Comments (Atom)
Grab My Blinkie

Proud Member Of

People I Stalk


0 comments:
Post a Comment